
Deploy Ruby On Rails 3 application to free hosting

Since Ruby On Rails 3 released I had a problems with deploy configuring like assets precompile. Of course if you deploy application to powerful host you won’t have any problems and deployment to such host will be standart and simple. But if you have server with not much RAM (less 1 Gb) you will have to waiting long time till assets precompiled. So, here I will tell how to avoid precompiling assets on the server and decrease time for deployment.
1. Free hosting
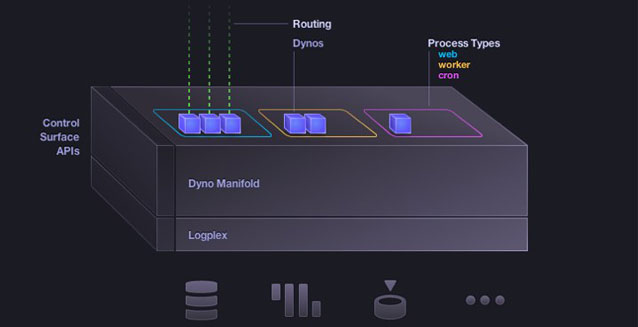
If you haven’t already known free ruby hosting I would recomend you to use heroku. It’s a beatiful freehosting which provides deploy Rack/Ruby On Rails applications.
 I won’t describe how it works here because you can find a lot of information about it on the oficial site.
I have been use free account for a months for my blog which you are reading now and I won’t have any issues with server fails, long loading or like that. Sometimes it was about 1000 visitors per hour and everything has done. So I think it will be enough free account for your starting services or staging/qa environments. If you haven’t enough memory you can buy web dyno for 36$ per month. Also you are able to install add-ons - it’s a wonderful heroku’s feature which saves your time with installing and configuring additional applications required for your application such as:
- Free email services
- Scheduling
- Databases
- Search engines
- and etc.
NOTE: there are restrictions for every add-on.
I hope you have already signed up here and ready to the next step.
2. Assets bucket
There are many variants to precompile assets and connect them with Rails 3 application:
- You can precompile assets on your local machine and make commit. But I think it is bad idea because you will have fat commits if any js/css change
- Precompiling assets during deploy on the server. Requires instance with at least 1 Gb memory and access to write files in assets directory
- Include assets directory in ignore for your VCS (Version Control Systems), precompile assets upload assets to the assets bucket. Assets bucket it’s a server which allow to save static data and get it through public url
I prefer 3rd variant because heroku doesn’t allow to save any files on the instance. Also 1 free web dyno has only 512 MB memory. To save assets in the bucket we should choose server with API for our issue. There are a lot of services in the internet: AWS S3, Dropbox, Rackspace Cloud Files and etc. It will be simple to use Dropbox for our problem: you have precompiled assets, you just copy them to Dropbox public folder, say to your application where it should look for assets and that’s it! But I prefer use S3 because I calculated that it will be cheaper for me in the feature.
3. Amazon S3
- Go to AWS and sign up there. Credit card with positive balanse is required
- Go to AWS console, choose S3 tab and create bucket
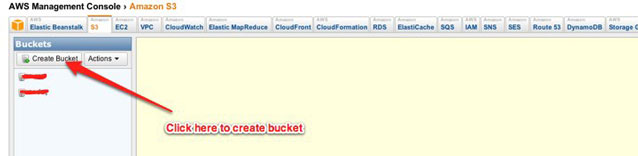
NOTE: there are variants of regions where to store bucket. So choose nearest for your feature visitors to have better response from server
- Go to CloudFront tab and create distribution for your bucket
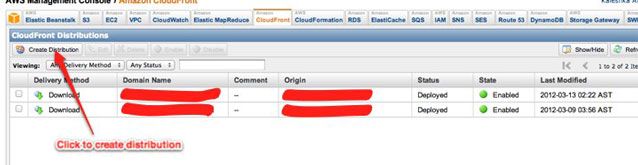
Please, wait for status changed to Deployed and State to Enabled. It will take a few minutes (usual it is 5-10 minutes)
4. Deployment
To upload assets in the bucket I use gem jammit-s3. It is simple to configure and to use.
- Add it your gem file this line: gem ‘jammit-s3’, :group => :development
- Install new gem by typing command bundle in terminal
- Go to AWS security credentials page and get there Access Key Id and Secret Access Key and create shell variables AWS_KEY and AWS_SECRET (steps 4-5)
- **export AWS_KEY=YOUR_ACEESS_KEY_ID **
- export AWS_SECRET=YOUR_SECRET_ACCESS_KEY
- Create file config/assets.yml with content:
s3_bucket: YOUR_BUCKET_HERE
s3_access_key_id: <%= ENV['AWS_KEY'] %>
s3_secret_access_key: <%= ENV['AWS_SECRET'] %>
s3_upload_files:
- public/assets/**/*- Edit your config/environments/production.rb file:
MyApplication::Application.configure do
  # Code is not reloaded between requests
  config.cache_classes = true
  # Full error reports are disabled and caching is turned on
  config.consider_all_requests_local       = false
  config.action_controller.perform_caching = true
  	# Disable Rails's static asset server (Apache or nginx will already do this)
  config.serve_static_assets = false
  # Compress JavaScripts and CSS
  config.assets.compress = true
  # Don't fallback to assets pipeline if a precompiled asset is missed
  config.assets.compile = false
  # Generate digests for assets URLs
  config.assets.digest = true
  # Specifies the header that your server uses for sending files
  # config.action_dispatch.x_sendfile_header = "X-Sendfile" # for apache
  config.action_dispatch.x_sendfile_header = 'X-Accel-Redirect' # for nginx
  # Enable serving of images, stylesheets, and JavaScripts from an asset server
  config.action_controller.asset_host = "http://YOUR_BUCKET_NAME.s3.amazonaws.com"
  # Enable locale fallbacks for I18n (makes lookups for any locale fall back to
  # the I18n.default_locale when a translation can not be found)
  config.i18n.fallbacks = true
  # Send deprecation notices to registered listeners
  config.active_support.deprecation = :notify
end
Pay attention on config.action_controller.asset_host, it should be your bucket url!
-
Add public/assets to .gitignore:
/public/assets
In production mode file manifest.yml is required. It generates to the /public/assets folder when assets are precompiling. I see the nice solution in changing path for manifest.yml file. Go to the config/environments/production.rb and edit it like this way:
# ...
# Defaults to Rails.root.join("public/assets")
config.assets.manifest = 'public/manifest'
# ...
We have ready to deploy application. Let’s precompile assets:
RAILS_ENV=production rake assets:precompile --traceUpload assets to S3 is very simple:
bundle exec jammit-s3Create heroku application:
heroku create
Make commit, and push it to the heroku:
git commit -am 'assets precompiled'
git push heroku master
Default DB for heroku application is postgresql. If you would like to change it install preferred for you add-on.
Of course you should run migrations if your application has it:
heroku run rake db:migrate
heroku run rake db:seed # if you have required seeds
I hope this post will be useful not only for me. Thanks for reading!